Part 1

I’m now half-way through my allotted time in Scotland to carry out the annual chores, or maybe joys, depending on how things are working out.
Firstly, I must admit, it is a bit of a pain having the boat 500 miles from home. You can’t just decide “Oh it looks like a nice day tomorrow, I’ll pop down the boat and do some varnishing”. So, you need to book your time in advance, and you have no idea what the weather will be like. In mitigation, I try to arrange having the boat moved into a shed so I can work to a schedule without being affected by the weather.
So, my cunning plan this year was to drive to Dunstaffnage, near Oban -500 miles- on Saturday 2nd May. This is later than usual because I had a rigging job to complete in April. I would then park up the camper van and trailer in the boatyard and spend Sunday taking off the covers and washing down the boat so it would be all ready to go in the shed. Sadly, this cunning plan wasn’t to happen. There was a delay with a boat coming out of the shed and I would have to wait a week before a place was available. It happened to be a pretty grim week weather wise. The temperature was about 7 or 8 during the day and 2 or 3 at night. So cold, that I turned the fridge off in the van as it was keeping my beer warm. It was windy and wet as well. The shower block was running cold water until Thursday and the Wide Mouth Frog bistro bar was shut. It was indeed a thoroughly bleak week. The evening trip to the Dunbeg stores was my sole entertainment.
All I could do was to sort out the antifouling and tinker around with non-crucial jobs. I had managed to get the mast put in the shed, so I prepped that, and touch primed the dings and knocks. Too be fair, I never really ran out of things to do and right now I am pretty knackered. In fact, I’m too knackered to even enjoy the evening highlight of the stroll to the Dunbeg stores. Luckily, I found a bottle of Rioja on board the good ship so I can sip that while the rice cooks in the van.
I’ve decided that next year I need to allow more time. This is far to stressful! I reckon one week working in the yard, two weeks in the shed and another week at the end will make life more enjoyable. If there is no Wide Mouth Frog open, then I think a bed and breakfast near a pub will bring back some civilisation and make the annual boat maintenance a more enjoyable task.
Luckily, I have a splendid yard neighbour called Nick from Aberdeen. He is polishing his 46ft yacht called Springtide. Too be honest it looked pretty smart before! It is being launched on Tuesday. His plan is too head of toward Portrush later in the season.
I also met a lovely couple with their trailer sailer. It is a beautifully built little boat but I cant remember the name except it ended with a “B” maybe Bounty B? They managed to choose probably the worst week of the year to sail around Mull which they sensibly abandoned and settled for more sheltered spots. They commented that they were the only boat visiting these places which left them in splendid isolation, although to be fair I think they would have enjoyed a more sociable visit to a pub bustling with sailors. They are off back to Cumbria now.
Some notes to remember,
- Bring a door mat for both the van and the ladder up to the boat. The yard is a mixture of mud or gritty dust depending on the weather
- Bring another mat for the top of the ladder
- Bring a drugget or strip of carpet for working on the ground under the boat
- Bring some knee pads!
- I love my new multi-purpose ladder. It cost £50.00 from Screwfix which is stupidly cheap. It fits on the trailer easily, reaches to the top of the stanchions and is a perfect working height when used as a step ladder. I haven’t experienced the joy of using it as a hop-up yet but I am so glad I bought it. £50 is quite bizarre.
- If you need to work in the rain, then abrasive pads are the way to go
- Best to buy two or three small “Blue” rolls rather than one massive one. The white one I had wasn’t resilient enough and tended to disintegrate.


My Annual Maintenance Take List is in the Download Section of this website. I obviously need to add some things before next year!
Part 2
The boat was moved into the shed as promised first thing on the Monday morning. The yard crew always do a professional job and I have no fear of damage to the boat. There were three other boats in the shed – one is sitting there waiting to dry out for osmosis treatment (something us woodies don’t need to worry about!), one is having the teak decks re-caulked and the other, a very nice Kim Holman boat about 42ft long owned by Nick, is having a big refurbishment. The relevance of all this is – are they going to kick up a load of dust? And luckily for me all seems good so far at least- no more leaf blowers!
Day One (In the Shed)

Using 320 grit Festool abrasives and a Rotex 125 machine I sanded the hull and the flat areas of the toe rail. I prefer 320 grit to 400, actually I would used 360 grit if it still existed. I then used the Festool Delta sander to sand any areas around the deck that were accessible. With the machine connected to the Festool Systainer vacuum there was no dust. I then vacuumed and wiped the hull will isopropyl alcohol. There were a few Rocna dings that I spotted which were masked off with tape.

Finally I antifouled around the waterline and over the old prop marks. We aren’t allowed to work after 17:00 so it is very tricky to schedule the work so you aren’t half way through a job at closing time..
Day Two
I spent the day finishing off the sanding and cleaning of the boat ready to start the varnish. I also varnished the mast and boom.

Each day I add a coat onto the little damaged knocks and dings. I like to mask the knocks and dings with masking tape rather than attempting to fade off the brush marks which never works with me. The advantage of the tape is you can see a small tell-tale ridge through the final coat so that extra build up layers can be added afterwards – not ideal but quite serviceable.
Day Three
This was varnishing day for the hull. I add about 10% Owatrol to the Epifanes varnish to improve its flowing and it helps to maintain the “wet edge”. My brushes are meticulously cleaned with triple White Spirits then soap and water and finally wrapped carefully in newspaper. I like to use a brush comb but they are hard to buy nowadays.


Before varnishing, I wipe down the surface with Isopropyl Alcohol and then, just seconds before varnishing, I use a Tack Rag to remove any final traces of dust by very lightly stroking the surface. I put the varnish on as fast as possible using the biggest possible brush with a swishing motion and finally I tip off vertically in preference to horizontally. This helps to avoid the varnish from sagging. At the end of the day you need to build up a thick coat so it is important not to spread the varnish too far.


It took a day to varnish the hull and toe rail area with about a hour or so to spare for the 17:00 curfew. It only used about 750 ml of the varnish and Owatrol mix. Interestingly a 26 ft foot boat uses about 250 m of masking tape!
Day Four
With the hull varnished it is time to varnish the margin boards, coach roof and cockpit. I still have some masking up to complete to I suppose I started to apply the varnish around 09:30 but as I had to finish at 17:00 I didn’t quite have time to complete the coach roof starboard side. Best not to rush these things so I packed up my brushes at 16:30.
There were some scary moments when some kind of sanding machine started on another boat in the shed and created a cloud of dust. It settled on some of the varnish but that’s life and not worth getting too hung up about it.


Day Five
This is my last day in the shed. I was about to varnish the remaining side of the coachroof when I saw a cloud of dust heading my way so I quickly wrapped the brushes up and put a lid on the paint kettle. The dust was being caused by a grinder being used to remove old varnish. Not a weapon that I’d choose and sadly grinders do tend to kick up the dust as there’s no means of attaching extraction equipment. Grinding glass fibre being about the worst thing ever. Interestingly cutting holes in glass with an oscillating tool like the Fein Multimaster creates no dust at all, it just drops to the ground!
There must be a sensible solution to sharing workshop spaces. I cant expect everyone to stop working because I am about to do some varnishing. I would suggest the following would really help.
- Make the weekends “No Dust Days” so that quiet final coats can be applied whilst causing the least interruption to workflow.
- Insist everyone uses extraction equipment. Its not right that the operator is dressed up with PPE but creating a cloud of dust filling the whole workshop. The excellent Festool extractors connected to their tools virtually irradiate airborne dust.
It was agreed that the grinding would stop at 15:30 so I could apply the final bit of varnish which worked fine. In the meantime I painted the deck areas, triple coated the waterline with antifouling and cleared an engine seacock of mastic. I also applied lanolin to the propeller which probably wont work but we will see.
The Last Days and the Launch
I had Saturday as a free day as the mast was still locked in the shed. Mark arranged a team to lift it outside on the Sunday so I could do the rigging. I will replace all the rigging over the winter as some of the rigging screws are feeling like they will seize up soon. Very sadly I left all the halyards at home (except the main halyard) so there will be some mast climbing when I come up next.

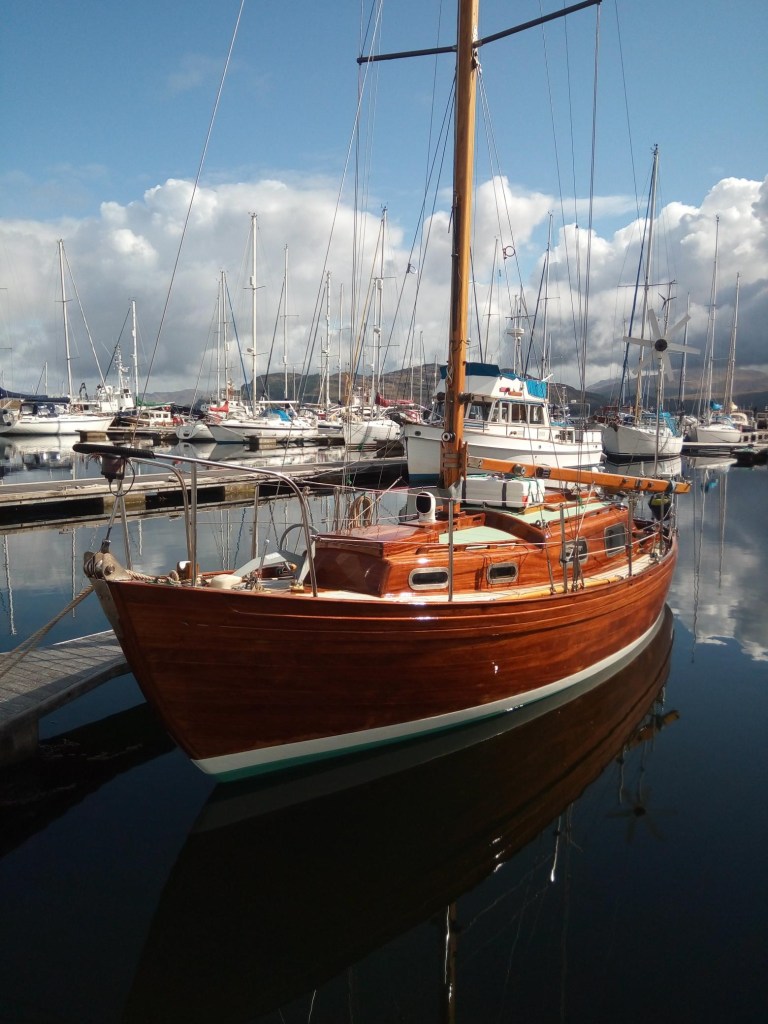
The boat came out of the shed on Monday and the mast was stepped. The tide was ebbing away but we just managed to catch it, so the boat was on a pontoon by lunchtime. I never put on a shaft anode as I was sent the wrong one, maybe I can snorkel and sort it out when I come back. I set up the rigging using the Loos gauge keeping the tension at between 8-10% of breaking load. I’ll tweak everything after the first strong sail. She took in no water, as usual. It takes a full day and a half to sort out everything onboard ready for a sail. I am yet to solder up the antennae plug and secure the mast wedges but otherwise she is ready for a sail.

I loaded up the trailer with five Zarges boxes and the ladder on top and drove back to London on the Wednesday. It took about ten hours. Just got to put everything away now!

Leave a Reply